iTunes can be used to sync photos from your computer to your iPhone and other Apple mobile devices. If you have photos (taken with whatever camera) stored in your computer and you want them to appear in an album in your iPhone, iPad, or iPod touch, you simply need two things: your USB cable, and iTunes. Let's begin the tutorial.
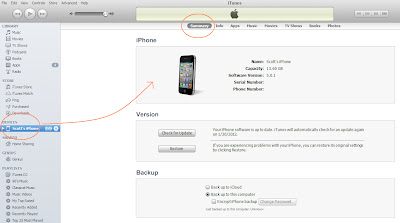
Step 4. Confirm that iTunes is able to detect your device. You will know this because the name of your Apple mobile device (e.g., Scott's iPhone or Sam's iPod) will appear in Devices on the left sidebar in iTunes (see screen shot below). If it's there, select it. Your device's Summary should appear in the center panel of iTunes.
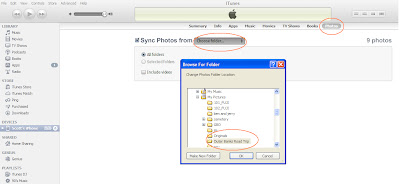
Step 5. On the top bar of your device's Summary in iTunes, select the Photos tab. The center panel should show you the option Sync From Photos. Select it - a tick mark will appear on the left box - and then select the list control button on the right to see the list of directories (For Windows PC the default folder name chosen in the list control box is My Pictures). Select Choose folder... from the list. A dialog box will appear, and then point to the location of the folder that you created in Step 1. Once you have selected the folder name, select OK to close the dialog box.
Well, there you go. You have just synced photos to your device using iTunes in 6 easy steps. You can continue to sync more folders of photos as much as the free space in your device allows. Remember that next time you sync using iTunes, whatever changes you make on the folder containing the photos in your computer will be reflected in your device - if you added or removed a photo, all changes will be synced as well. To delete synced photos from your device, remove the selection of the folder in Sync Photos From in iTunes in your computer.
Step 1. In your computer, organize the photos you want to sync by putting them in a folder. For example, if you want to transfer photos from a summer trip, put them all in a folder with a descriptive name. For this tutorial, I have named my folder "Outer Banks Road Trip". You can put the folder in a directory that you can easily locate for syncing later.
Step 2. Connect your iPhone (or other Apple mobile device) to your computer with the USB cable.
Step 3. Open iTunes. While it's not crucial for this tutorial, it is always a good idea to make sure that your iTunes is up to date. The latest version of iTunes may offer new features and fixes to bugs that might have been present in the previous version. To do this, just go to Help menu and select Check for Updates.
Step 4. Confirm that iTunes is able to detect your device. You will know this because the name of your Apple mobile device (e.g., Scott's iPhone or Sam's iPod) will appear in Devices on the left sidebar in iTunes (see screen shot below). If it's there, select it. Your device's Summary should appear in the center panel of iTunes.
Step 5. On the top bar of your device's Summary in iTunes, select the Photos tab. The center panel should show you the option Sync From Photos. Select it - a tick mark will appear on the left box - and then select the list control button on the right to see the list of directories (For Windows PC the default folder name chosen in the list control box is My Pictures). Select Choose folder... from the list. A dialog box will appear, and then point to the location of the folder that you created in Step 1. Once you have selected the folder name, select OK to close the dialog box.
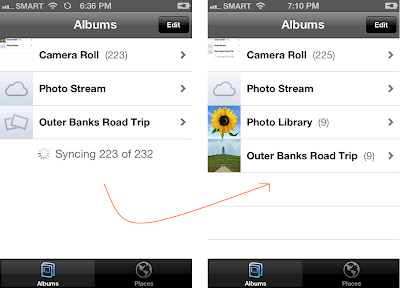
Step 6. On the lower right corner of iTunes select the Apply button. Your iTunes should then show statuses similar to "Syncing Scott's iPhone" and "Starting Sync". On your iPhone, or whatever Apple mobile device your syncing photos to, the sync symbol should appear on the top bar of the screen, between your network's name and the time. When you open the Photos app, you will also see that an empty album with an exact name of the folder your created in your computer in Step 1, and the status "Syncing..." directly below it (see screen shot below).
 |
| When you hit the Apply button in iTunes, photos from the specified folder will be synced to the Apple mobile device. Once photo syncing completes, the album will appear in Photos app. |
Notice that two albums are created. Outer Banks Road Trip, and Photo Library. Actually Photo Library is not an album and it is not contain duplicate photos to ones you synced. This is just iOS 5's way of creating a library or a point of access to all photos that you sync to your iPhone or other Apple mobile devices. If you sync another batch of photos to your device, a new album, say "Malik's Stag Party", will appear and the photos in that album will also appear inside the Photo Library. Again, there's no actual duplication of photos. Think of Photo Library as, a thumbnail or preview of all the photos that you have synced to your device.
Well, there you go. You have just synced photos to your device using iTunes in 6 easy steps. You can continue to sync more folders of photos as much as the free space in your device allows. Remember that next time you sync using iTunes, whatever changes you make on the folder containing the photos in your computer will be reflected in your device - if you added or removed a photo, all changes will be synced as well. To delete synced photos from your device, remove the selection of the folder in Sync Photos From in iTunes in your computer.

