How to Update iPhone 3gS & iPhone 4 to iOS 5.1.1 Preserving your Baseband for Unlock


Jailbreaking Tool used here is Redsn0w 0.9.11b4. We will first use it to Put our iPhone 3gS or iPhone 4 in Pwned DFU mode as shown in the video. Then we will use iTunes to upload a CUSTOM iOS 5.1.1 (NO Baseband firmware) onto our iDevices. This will NOT Change our baseband. So that we are able to Unlock our iPhone 3gS by installing Ultrasn0w from Cydia. And in case of iPhone 4 we will use Gevey Ultra sim to Unlock.
Remember that this Redsn0w will Tether Jailbreak your iDevice. In order to make it Untether, you will need to install 'Rocky Racoon 5.1.1 Untether' from Cydia. Just follow simple steps shown and demoed in the video. You will successfully complete everything you need.

IMPORTANT: iPhone 3gS Users MUST choose to check mark 'install iPad baseband' option and Cydia option. This will re-flash your iphone 3gS baseband and then you will be able to unlock by Ultrasn0w from Cydia. But in order to Unlock you will need to add this source in Cydia
http://repo.iparelhos.com Then install 'Ultrasn0w 5.1.1 fixer'. Then search for 'Ultrasn0w' normally in Cydia. Install it. Reboot . You should be Unlocked successfully.

Download Redsn0w for Windows: http://uploading.com/files/faaa43f7/redsn0w_win_0.9.11b4.zip/
Download Redsn0w for Mac: http://uploading.com/files/94ae418a/redsn0w_mac_0.9.11b4.zip/

Download Custom iOS 5.1.1 for iPhone 3gS http://uploading.com/files/aca6c63b/NO_BB_iPhone2%252C1_5.1.1_9B206_Restore.i...
Download Custom iOS 5.1.1 for iPhone 4 http://uploading.com/files/9b5bc98d/NO_BB_iPhone3%252C1_5.1.1_9B206_Restore.i...
Download all/any (in this case iOS 5.1.1) Firmware for your iPhone http://www.iclarified.com/entry/index.php?enid=750

HELPFUL TIPS:
a) You must have Winrar installed on your computer. If not then google it or download it from here http://www.win-rar.com/download.html This will help you in Unzipping redsnow.
b) How to remove errors while updating to iOS 5 http://twitpic.com/9rjcgy
c) If your Redsn0w crashes , make sure to close iTunes. Also , run this redsn0w in Adminstrative mode. Right click on it and choose 'Run as Administrator'. You can also right click on Redsno0w and go to Properties then Compatibility mode. Change compatibility mode to windows 98/Me. And choose ' Run as administrator' from below. Then run Redsn0w.
d) If you have an iPhone 3gS and Redsn0w crashes at point when you choose Cydia and install iPad baseband option, then do it one by one. First time choose Cydia option and follow up with the jailbreak process. Then run Redsn0w again and now choose iPad baseband option.
e) Once you open Cydia, let it load its sources completely. If after 10 minutes it is still loading, then close redsnow and open it again. Now again let it load its sources again. Go to 'Changes' tab in Cydia and Upgrade any sources that needs to be upgraded. Then simply search for 'Rocky Racoon 5.1.1 Untether' to make your Jailbreak Untether.
f) How To Backup Your Jailbreak Apps And Tweaks From Cydia http://tinyurl.com/899nlzu
g) How to backup Data through iTunes http://osxdaily.com/2010/06/22/how-to-backup-your-iphone/
h) You can also make these No Baseband Firmwares (Custom iOS 5.1.1) from Redsn0w given in this video. Just Launch Redsn0w 0.9.11b4. GO to 'Extras' option. Then go to 'Select IPSW'. Choose Official iOS 5.1.1. Now go to 'Custom iPSW' button. Click on it and choose again Official iOS 5.1.1. This will make your No Baseband firmware. To do all this, make sure that your Redsn0w is located on your Desktop, and also your iOS 5.1.1 Firmware.
j) Above given No Baseband iOS 5.1.1 firmwares (Custom iOS 5.1.1) are also uploaded here:
For iPhone 3gS: http://www.4shared.com/file/ajWY-qY5/NO_BB_iPhone22C1_511_9B206_Res.html
For iPhone 4: http://www.4shared.com/file/YA3KDSUX/NO_BB_iPhone31_511_9B206_Resto.html

[VIDEO] How to change your iPad baseband 06.15.00 back to 05.13.04 on iPhone 3g/3gS http://www.youtube.com/watch?v=nUxXcukxVVI

[VIDEO] How to Unlock iPhone 3gS WITHOUT WiFi on 5.1.1 firmware with 06.15.00 baseband http://www.youtube.com/watch?v=O-Yxv-lffn4

[VIDEO] How To download FREE/Cracked apps on your i-Device follow this video:
http://www.youtube.com/watch?v=fTwZDGzlAn4

How to Fixing an iPhone Stuck at Apple Logo?


How to Fixing an iPhone Stuck at Apple Logo

After jailbreaking, updating the OS, or restoring from backup an iPhone, iPod touch, or iPad, a problem can sometimes occur in which the iPhone won't boot properly. In this situation, the iPhone can get stuck at the Apple logo, or sometimes in an endless loop of rebooting--both of which render the device unusable.

In most cases, you can solve these problems by putting the phone into recovery mode and restoring it from backup. To do that, follow these instructions:
  1. Connect the iPhone's USB cable to your computer, but not your iPhone.
  2. Turn your iPhone off. If the phone won't turn off in the traditional manner, just keep holding the buttons until the screen goes dark.
  3. Once you've turned the device off, press the home button on the face of the device and plug in the USB cable to the device's dock connector.
  4. When it turns on, keep pressing the home button until the iTunes logo appears on the screen.
  5. You'll know the phone is now in recovery mode because a window in iTunes will tell you.
  6. You can then start the restore process by clicking the "Restore" button in the iTunes window.

How to Make and Receive Free Calls On Your Smartphone with Google Voice!


Video Description: "Smartphones like the iPhone and Samsung Galaxy Nexus are awesome, but can cost an arm and a leg for data and call plans. What if there were a way to get around carrier costs? AppJudgment's resident jailbreaking expert Michael Hand is here to show you how he makes it work."

Check out these awesome iPhone-controlled RC cars

There’s no shortage of iPhone-controlled vehicles on the market these days. We’ve seen cars, helicopters, robots, and even tiny spheres that can be controlled with Apple’s handset. But we’ve never seen anything look this good. The folks over at iHelicopters.net, yes, the makers of the rocket-launching Cobra copter, just informed us that they’ve got a new lineup of iPhone-controlled RC cars out that we wouldn’t want to miss. And they were right… The company’s RC car collection comes in a number of different flavors. You can choose from gorgeous replicas of popular makes and models including an Audi R8, Q7, BMW X6, 5 series, or a more ruggedly-designed stunt racer. The cars are controlled by a dedicated iOS app, which interfaces with an audio jack transmitter. And judging from the video, they seem to be pretty well made. They’re fast, responsive, and can last for up to 60 minutes on a single charge. If you’re interested, you can purchase one of these awesome cars from iHelicopter’s online store. It looks like all models run just under $60/RM180, which is about middle-of-the-road for remote control vehicles. What do you think? Are these cars awesome or what?

How to Lock Portrait Orientation in iPhone 4S

iPhone 4S held sideways with the Portrait Orientation Lock enabled.
The iPhone 4S Portrait Orientation Lock prevents your screen from shifting to landscape mode when you're reading and lying down.

How do you lock portrait orientation in iPhone 4S when the screen orientation automatically changes with how you hold your phone? In Messages for example, you can type in landscape or portrait orientation by just holding the phone sideways, or upright. This landscape-portrait orientation shift happens automatically. But what if you're lying down? You're going to be holding your phone sideways and so your screen shifts to landscape orientation. How do you lock it to portrait orientation so you can type and read stuffs upright?

Step 1. You can lock the portrait orientation in iPhone 4S by first double clicking the Home button. Four of your recently used apps will appear at the bottom of the screen.

The recently used apps in iPhone 4S appears in view by clicking the home button twice.
The recently opened apps will appear by clicking the Home button twice in iPhone 4S.

Step 2. Now swipe right over the apps and you'll end up with five icons (left to right): The Portrait Orientation Lock, three music control buttons, and the Music app. The Portrait Orientation Lock is the leftmost icon with the circular arrow symbol.

The Portrait Orientation Lock icon appears by swiping to right over the recently opened apps.
Swipe right over the recently used apps to find the Portrait Orientation  Lock icon.

Step 3. To lock the iPhone 4S screen in portrait orientation, select the Portrait Orientation Lock icon. A "lock" will appear inside the circular arrow, and the status 'Portrait Orientation Locked' will briefly appear below the icons. Select the Home button again to exit.

The Portrait Orientation Lock enabled.
The Portrait Orientation Lock icon, once selected, will show a "lock" symbol inside the circular arrow.

Notice that the Portrait Orientation Lock symbol will also appear in the status bar right at the top of the Home Screen and between the time and the battery level symbol.

The Portrait Orientation Locked symbol appears in the status bar at the top of the iPhone 4S screen.
That "Portrait Orientation Locked" symbol appears in the status bar when it is enabled.

With the portrait orientation locked, you can only type, browse photos, and read in upright position. Of course, apps that are developed and released in landscape view cannot be "forced" to portrait. To disable the portrait orientation lock, just repeat the three steps above. When you do that, the "lock" will disappear from inside the circular arrow symbol in the Portrait Orientation Lock icon, the status "Portrait Orientation Unlocked" will confirm your action, and you can start shifting between landscape and portrait orientations again.

Additional info: It is the 
gyroscope inside the iPhone 4S that senses and maintains the screen orientation using the concept of angular momentum (Google is your friend). Circuits inside your phone receive the gyroscope output, feeds it to your firmware, and your firmware decodes the output and shifts the screen orientation accordingly.

How to Add Birthdays in the iPhone 4S Calendar

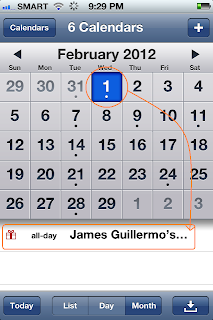
If you want to add someone's birthday in your iPhone 4S Calendar, you will need to add a Birthday field to that contact in your Contacts app. The iPhone 4S Mail, Contacts, and Calendar apps are integrated so specifying a birthday to a contact would result to a birthday event being automatically created in your Calendar without you having to create (or reenter) it manually. Birthday events will be treated as all-day appointments. Like ordinary appointments, you will get a notification or alert for birthday events as well. Below is a step-by-step tutorial on how to add a birthday field to a contact, and consequently a birthday event to the iPhone 4S Calendar.

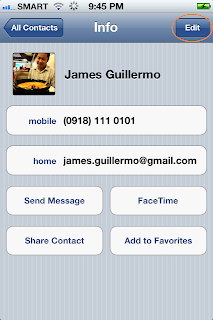
Step 1. Go to Contacts. Open the contact that you want to a add a birthday field to. Select Edit.

Screen shot of a contact's Info panel in iPhone 4S.
The Edit button for a contact's info in iPhone 4S can be found on the upper right corner of the Info panel.

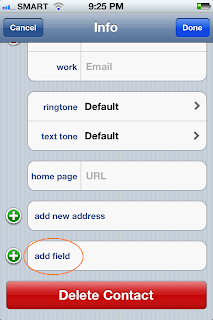
Step 2. Browse all the way down to the bottom of the contact's Info, and select add field.

Screen shot of add field option in a contact's info in iPhone 4S.
The "add field" option for a contact's info lets you add details like Nickname, Job Title, and Birthday.

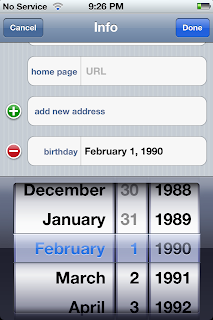
Step 3. From the Add Field list, select Birthday and specify the contact's birth date. After that, select Done.

Screen shot of add birthday field option for a contact's info in iPhone 4S.
You can specify a contact's birthday by rolling through the month-date-year  selector in the add Birthday field.

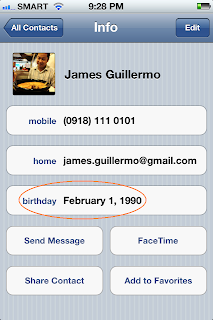
Step 4. The contact's birthday should appear in Info along with the contact other details (mobile, email, etc.).

Screen shot of contact's Info panel in iPhone 4S with a birthday field.
A specified birthday will appear along with the contact's other details in Info.

Step 5. Go to Calendar, and confirm that a birthday event has been created for that contact.

Birthday event in iPhone 4S Calendar.
To view a birthday event in Calendar, simply select the date and it should be listed at the bottom  along with other available appointments for the selected day.

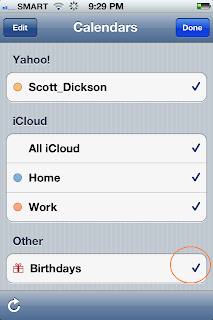
Step 6. Make sure that the Birthdays is always enabled in Calendars so that birthday events will appear. To check, select the Calendars button on the upper left corner of the Calendars panel. Browse all the way to the bottom and make sure there is tick mark next to Birthdays.

How to enable the iPhone 4S Birthdays Calendar.
Enable Birthdays in Calendar to make sure that birthday events and alerts will be enabled in the iPhone 4S Calendars app.

That's it. You have just successfully added birthday events in the iPhone 4S Calendar by specifying birthday fields in Contacts. If you want to add a birthday event for a person that is not in your contacts list, you can just add the birthday as a normal event or appointment in your Calendar. Just tap on the "+" (plus or add) sign on the upper right corner of the Calendars panel and specify Someone's Birthday in Title and the Starts and Ends time. Or, you can easily just use the Reminders app. For both cases, you can also ask Siri to do the job for you. The same steps apply for adding birthday events in other iOS devices namely iPad, and iPod touch.

How to Auto-Enhance Photos in iPhone 4S

One of the photo editing tools available in iPhone 4S is Auto-Enhance. This post-processing tool applies automatic adjustment on the brightness, contrast, and saturation (color) of captured photos. To enable Auto-Enhance, open a photo from the iPhone 4S Photos app, tap it once to bring out the top and bottom tool bars, and select Edit. Select the "magic wand" symbol from the bottom tool bar to apply Auto-Enhance, and hit Save. That's it, your photo should be enhanced instantly.
iPhone 4S shot with Auto-Enhance photo editing tool enabled.
The Auto-Enhance photo editing tool in iPhone 4S automatically fixes the brightness, contrast, and saturation of a photo.
iPhone 4S shot with Auto-Enhance photo editing tool disabled.
Washed-out raw iPhone 4S shot due to high natural brightness. This is the same (single) shot from above, only Auto-enhance is disabled in this photo.
When you apply Auto-Enhance, the "Auto-Enhance On" indicator appears on the lower left corner of the photo while on Edit. The cool thing about this feature is that you can undo or turn off the auto-enhancements anytime after you have applied it and even if you have already saved the edited photo. To turn off Auto-Enhance, just open the photo again, select Edit, and select the "magic wand" symbol. The "Auto-Enhance Off" indicator should appear on the now raw photo. The undo and redo of "Auto-Enhance" is limitless. You can apply and remove photo enhancements even when you have powered off , or reset your iPhone 4S. 

How to Solve Music Problems After Absinthe Jailbreak


Many people who have jail broken their iOS devices by absinthe jailbreak from chronic dev team are facing the issues of music not working. This problem is faced by many on their iphone 4S and ipad 2. Absinthe jailbreak is causing a lot of issues such as music not working, songs getting stuck at 0:00, cydia not working etc. Some of the issues can be solved by installing the fix that are available or using the latest absinthe jailbreak. But some problems have to be worked around

Here are some tweaks that could solve some of the issues follow these step by step.

- Manually delete songs one after one and redowloading each song .this may not be the best idea but has worked for many facing the same issue.

- If you are subscribed to the services to iTunes match but are facing the same issues as mentioned earlier you can should disable the Match from settings then iTunes match then toggle the on/off switch to disable the iTunes match.

- If you are using any VPN connection .you should also delete that

- The next thing to do is to create backup of the device using the iTunes .once backup[ is created now we can safely restore the original firmware

- Make sure that have the latest version of the iTunes

- Now to good to restore the original firmware install the latest firmware using the iTunes it will take from 30-40 minutes so be patient.

- As we are done with firmware restore we can now restore the backup created previously

- Now as we are using the original firmware. We should now jailbreak the device using the absinthe jailbreak on windows pc.

- Once this jailbreak is done enable the iTunes match in the same way we disabled it previously by toggling the on/off switch

- Re-initiating the VPN if had any previously

- Re-download the songs that you previously had.

If you follow these steps correctly you might have your problems resolved by now a word of caution absinthe jailbreak at times appear to be stopped but be patience as it may take some time.

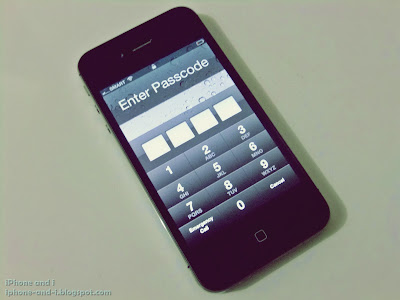
iPhone 4S Security: Simple Passcode On or Off?

Locked iPhone 4S screen requiring a passcode.
Simple Passcode in iPhone 4S keeps your phone from unauthorized access with a 4-digit code that's easy to type and remember.

If you enable Passcode in iPhone 4S (Settings > General > Passcode Lock), you'll also be given the option to enable or disable Simple Passcode. By default, Simple Passcode is toggled on. With this, you will be required to come up with a 4-digit code that can wake or unlock your iPhone from sleep mode, and allow you to start using it. This unfortunately also means that only 4 digits keep your personal data from getting accessed if events like your phone got stolen, or someone wants to mess around with your private stuffs ever happen. If you disable Simple Passcode, then you can choose a passcode that's not restricted by number of digits, or character choices - you can use any key or symbol available in the virtual keyboard. But the question is, "does enabling Simple Passcode help increase iPhone 4S security?" An even better question is, "do passcodes even really work to begin with?"

The answer to both questions is Yes. A simple passcode beats no passcode. And a NOT so simple passcode offers better security. Even with mobile phones - specially with mobile phones - your  intention always has to be to protect your own privacy and security. And the best way to do that is to utilize the security settings available in your iPhone 4S. Of course, there is going to be a little bit of a trade off. When Simple Passcode is disabled, it will generally take longer to unlock a phone - you'll be trying to input a possibly longer passcode of different key combinations, as opposed to a simple 4-digit numeric code. And this can be an inconvenience during emergencies; more so if you're phone is set to auto-lock every minute. It is also easier to forget a "complicated" passcode than a simple 4-digit one. A simple 4-digit numeric passcode on the other hand is way easier to crack.

So, should Simple Passcode be toggled on or off? Well, that's ultimately your choice to make. If you opt for Simple Passcode ON, make sure you don't go randomly sharing your 4-digits to anybody. If you opt for Simple Passcode OFF, then make sure your passcode is something you can type fast and remember easily. But whatever your choice may be, it's a good habit to also change passcodes from time to time. It ensures that if someone does figure out your passcode - whether you authorized it, or it just happened by accident - they won't know it for long. Also, don't let people you can't trust touch your iPhone. Privacy and security are things you need to take seriously. A lot of bad things can happen when your phone falls in the wrong hands.

How to Back Up Contacts Using iCloud

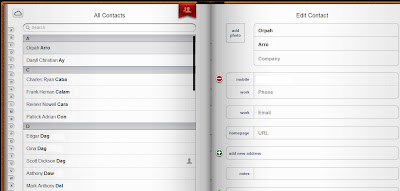
The easiest way to back up contacts in iOS 5 devices is through iCloud. Using Apple's latest data-syncing and cloud storage service allows iPhone, iPod touch, and iPad users to manage and store contacts over the air. If you are connected over Wi-Fi or 3G then you can immediately start using iCloud to back up your contacts in 2 easy steps.

Step 1. On your Apple mobile device (e.g., iPhone 4S), go to Settings > iCloud and toggle Contacts "ON". The message prompt "Your contacts will be merged with iCloud" will appear. Select Merge.

iCloud Contacts settings in iPhone 4S.
Enabling iCloud Contacts will merge the contacts from all your other devices, producing a single common contacts list that is stored and pushed in and by iCloud. 

Step 2. Log in to
iCloud.com using your Apple ID and select the Contacts app icon. The contacts in your Apple mobile device should already start appearing. Compare the number of contacts in your device and that in the iCloud address book. Scroll or browse all the way down to see the "numbers of contacts" detail for both lists. If they're not matching, right-click on the contacts list page in iCloud and hit Refresh. When they are, then iCloud has finished syncing.

How to Back Up Contacts Using iCloud
The iCloud Contacts "address book" can be accessed by logging in at iCloud.com. Users can edit a contact detail and the changes will be reflected in all "iCloud Contacts"-enabled devices.

What happens next?
Remember that when you enable Contacts in iCloud, there will only be one "master" contacts list for the cloud and your Apple mobile device. If you have many devices, then this has to be configured separately for each. For example, if you want your iPhone 4S Contacts changes to be reflected in your iPad, then you have to enable iCloud Contacts in iPad (Step 1 above). When you do that, whatever changes in contacts you do in iPad (e.g., edit a contact number, add a new contact, add a profile picture) will also be reflected in iCloud, and in your iPhone 4S.

You only have one device?
If you only have one Apple mobile device, you can still use iCloud Contacts. You can log in to iCloud.com and whatever changes you make on the list here, will be reflected on your device. The same is true, the other way around.

You deleted a contact?
If you delete a contact, this will also be deleted not only in iCloud but in the rest of your Apple mobile devices. Remember: one common contacts list.

You restored your device and lost all your contacts?
If you restored your device and lost all your contacts, iCloud hasn't. Resetting an iPhone, iPod touch, or iPad, does not reset the iCloud account. So if you want your contacts back, simply toggle on Contacts in iCloud (Step 1) again, and the cloud will start pushing your contacts back to your newly restored device.

With iCloud, you won't need your iTunes and USB cable to back up your contacts. All you need is to toggle a button, and it will take care of the syncing, pushing, and storing for you. 

How to Use the iBooks Night Theme

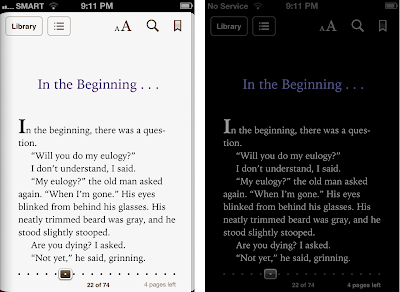
Comparison between Normal and Night themes in iBooks for iPhone 4S.
The iBooks Night theme dims out the brightness of the standard "white-page-black-texts" display of books. (Actual book in the screen shot: Have a Little Faith by Mitch Albom)

iBooks has a Night theme feature which "dims" the brightness and contrast of book pages for low-light and night reading. Night theme lessens the strain caused to the eyes by the brightness of the iPhone or any Apple mobile device's screen  in low-light environments. It changes a book's page color from white to black, and the texts to white. See sample screen shots below.

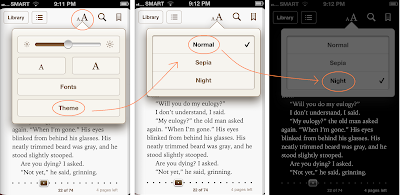
How to enable the Night theme in iBoooks for iPhone 4S.
You can switch between Normal and Night themes by touching the Font icon located at the top of a page of a book.

To enable the iBooks Night theme, you first tap on a page in any book to reveal the iBooks reading tools at top of the page. Touch the Font icon (AA), and then select Theme. From the list select Night. The page instantly dims down. Tap on any part of the page to hide the Themes list and continue reading. To go back to Normal theme, touch the Font icon again, then Theme, and then select Normal. The iBooks Night theme can be used  when you're flying on red eye where the lights are usually turned off, at night before going bed, or when you simply just prefer a dimmed screen.

How to Sync Photos Using iTunes

iTunes can be used to sync photos from your computer to your iPhone and other Apple mobile devices. If you have photos (taken with whatever camera) stored in your computer and you want them to appear in an album in your iPhone, iPad, or iPod touch, you simply need two things: your USB cable, and iTunes. Let's begin the tutorial.

Step 1. In your computer, organize the photos you want to sync by putting them in a folder. For example, if you want to transfer photos from a summer trip, put them all in a folder with a descriptive name. For this tutorial, I have named my folder "Outer Banks Road Trip". You can put the folder in a directory that you can easily locate for syncing later.
Step 2. Connect your iPhone (or other Apple mobile device) to your computer with the USB cable.

Step 3. Open iTunes. While it's not crucial for this tutorial, it is always a good idea to make sure that your iTunes is up to date. The latest version of iTunes may offer new features and fixes to bugs that might have been present in the previous version. To do this, just go to Help menu and select Check for Updates.

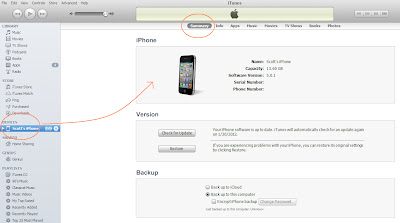
Step 4. Confirm that iTunes is able to detect your device. You will know this because the name of your Apple mobile device (e.g., Scott's iPhone or Sam's iPod) will appear in Devices on the left sidebar in iTunes (see screen shot below). If it's there, select it. Your device's Summary should appear in the center panel of iTunes.

Screen shot of the summary of an iPhone in iTunes when connected via USB cable.
Selecting your device's name from Devices in iTunes will show your device's Summary  page by default. From the top bar you can select the Photos tab so you can point to the location of the folder that contains the photos for syncing to your Apple mobile device.

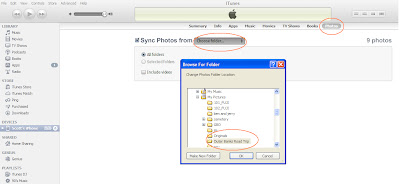
Step 5. On the top bar of your device's Summary in iTunes, select the Photos tab. The center panel should show you the option Sync From Photos. Select it - a tick mark will appear on the left box - and then select the list control button on the right to see the list of directories (For Windows PC the default folder name chosen in the list control box is My Pictures). Select Choose folder... from the list. A dialog box will appear, and then point to the location of the folder that you created in Step 1. Once you have selected the folder name, select OK to close the dialog box.

Screen shot of Photos tab in iTunes where the Sync Photos from option is available.
Your device's Photos tab in iTunes gives you the option to choose the folder  in your computer that you want to sync photos from. You choose a folder by selecting it from the dialog box that appears when you select Choose Folder from the list control button.
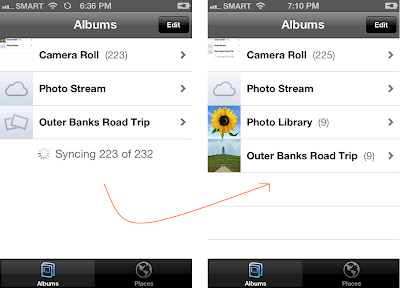
Step 6. On the lower right corner of iTunes select the Apply button. Your iTunes should then show statuses  similar to "Syncing Scott's iPhone" and "Starting Sync". On your iPhone, or whatever Apple mobile device your syncing photos to, the sync symbol should appear on the top bar of the screen, between your network's name and the time. When you open the Photos app, you will also see that an empty album with an exact name of the folder your created in your computer in Step 1, and the status "Syncing..." directly below it (see screen shot below).


Photos synced to an iPhone via iTunes appear in the Photos app organized into albums.
When you hit the Apply button in iTunes, photos from the specified folder will be synced to the Apple mobile device. Once photo syncing completes, the album will appear in Photos app. 

Notice that two albums are created. Outer Banks Road Trip, and Photo Library. Actually Photo Library is not an album and it is not contain duplicate photos to ones you synced. This is just iOS 5's way of creating a library or a point of access to all photos that you sync to your iPhone or other Apple mobile devices. If you sync another batch of photos to your device, a new album, say "Malik's Stag Party", will appear and the photos in that album will also appear inside the Photo Library. Again, there's no actual duplication of photos. Think of Photo Library as, a thumbnail or preview of all the photos that you have synced to your device.

Well, there you go. You have just synced photos to your device using iTunes in 6 easy steps. You can continue to sync more folders of photos as much as the free space in your device allows. Remember that next time you sync using iTunes, whatever changes you make on the folder containing the photos in your computer will be reflected in your device - if you added or removed a photo, all changes will be synced as well. To delete synced photos from your device, remove the selection of the folder in Sync Photos From in iTunes in your computer.

Reset iPhone 4S - Which one do you need?

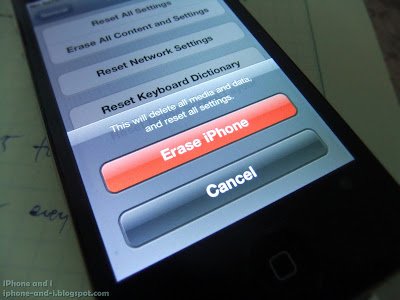
The reset options available in iPhone 4S for iOS 5.
The reset options in iPhone 4S allow you to remove data, reload default factory settings, and restart your iPhone as new.

There are several reasons why you would want to reset your iPhone 4S. For one, it is a basic "fix" to a mystery problem - which is quite true for most gadgets. When phones and other electronic devices start to act up, or when you're not sure what settings you've changed exactly, a reset usually fixes things and puts phone behaviors back to normal. Some reset options also reloads default settings back to your phone. The iPhone 4S has several reset options. This article will discuss all of those, what they are for, and when you might need to do them.

Reset All Settings

This option resets all user-defined configurations in iPhone 4S.
What it does: Reloads all default settings: forgets your Wi-Fi networks, removes changes to Alert Styles in Notifications, Turns off Locations Services for third-party apps, sets Sounds, Brightness, and Wallpaper back to original configurations, removes Battery Usage statistics, turns off Siri, turns off Cellular Data, disables Wi-Fi sync, sets Auto-lock back to 1 minute, removes added International keyboards, and turns off all Accessibility options.
What it doesn't do: This option does NOT delete anything - pictures, contacts, music, apps, nothing. All media and contents will remain after the phone resets.
When do you need it: You might need this option if, after trying so many things, you still can't put something back to its original behavior - Safari won't let you log in, Push Notifications are not working, some Edit or Delete options are missing. This reset option is safe because you will not lose any data, and you can easily reconfigure your iPhone 4S back to your desired settings in less than 3 minutes. Make sure you turn on Cellular Data after reset if you normally use 3G for Internet connection (Settings > General > Network > Cellular Data "ON"). Everything else is easy. Prompts for apps will also start to come up, the way they would when you first used them, so you don't need to go through each changed setting one by one.  This is the safe, easy, one-stop setting to get things running back normally.

Erase All Content and Settings

This option resets your iPhone 4S as a "new" phone. This is the Reset to Factory Settings option.
What it does: Do everything in Reset All Settings (Option 1) and erase everything you have in your iPhone 4S - removes your Apple ID from the phone, all music, photos, and apps will be erased. All traces of user-defined configurations will be removed.
What it doesn't do: Nothing. It puts everything back to factory settings. (New iPhone 4S!)
When do you need it: when you want to delete everything from the phone without going through the contents one by one; when you want to hand down your used iPhone 4S as a gift to somebody else; the last resort for when Reset All Settings (Option 1) won't fix your issue. Note: You will have to reactivate your iPhone 4S if you choose this option. Remember when it was new and you had to put a SIM card to activate it, connect to Wi-Fi or iTunes and all that? You will go through all those steps to make the phone usable again. But when you're done, your iPhone 4S is clean as new. Back Up important data before you proceed.

Reset All Network Settings


This option resets your wireless and cellular network connection settings.
What it does: For home or office wireless networks: This will clear out your Wi-Fi passwords, and the IP Address settings associated to your saved wireless networks. If you have a network administrator who assigned Static IP and DNS addresses to your iPhone 4S, all these will be deleted. Manual HTTP Proxy settings will be removed. For cellular networks: Your VPN Configurations will be removed.
What it doesn't do: Everything outside of Wi-Fi and cellular settings will be left unchanged. No data will be removed.
When do you need it: you can't connect to Wi-Fi and you're sure that you have provided the correct password; you can detect a wireless network but you can't join; when you're experiencing network, or signal problems. If you have special network settings assigned to your phone then you might need to contact your network administrator, or Telco about doing this reset option. If you are your own network administrator, and your Telco does not put special settings on your phone to connect to 3G other than the Cellular Data toggle button, then you can select this option anytime you want.

Reset Keyboard Dictionary

This option removes all words you commonly use in typing but are not in the default dictionary.
What it does: When your language setting is in English and you randomly type foreign words, the keyboard Auto-Correction feature will try to correct your typing. When you keep on using a foreign word it will be saved by the keyboard dictionary and the next time you try to type it, it will be included in the Auto-Correction suggestions. The Reset Keyboard Dictionary removes all non-English words (or misspelled words you insist on using) from the iPhone 4S keyboard dictionary.
What it doesn't do: It doesn't remove your added
International keyboards and custom Shortcuts.
When do you need it: If you just want to reset the keyboard dictionary back to its default settings.

Reset Home Screen Layout

This option resets the arrangement of built-in apps in your home screen back to default layout.
What it does: Puts the layout of your Home screen back to original. Removes built-in apps from folders when they aren't originally in one.
What it doesn't do: It doesn't change your wallpaper. It does not delete any app.
When do you need it: When you can't find an app icon. You can't delete a built-in app but if you can't find it, this option will put it right back where it used to be.

Reset Location Warnings

This option turns off all Location services for built-in and third party apps.
What it does: When you use an app for the first time, you get the prompt "App Would Like to Use Your Current Location". This option will remove all your previous choices to this prompt for all apps. Facebook, Camera, Weather widget will have to ask your permission to use Location services again.
What it doesn't do: It doesn't affect your Notification settings. If you have enabled push notification for a game, you might still get an alert for when an update is available even if you have disabled Locations services. No data are removed from the phone.
When do you need it: When you want to reconfigure Location services and re-filter apps that can and cannot use the service. You can also manually set Locations for each app by going to Settings > Location Services.

There you go, those are all the available reset options in iPhone 4S in iOS 5. It is important to understand what each one does so that when the need comes up, you will know exactly which option to choose. The reset option cannot repair a hardware damage in your iPhone 4S. So if there are visible physical damages to your phone, or you can can recall dropping it on the floor or spilling water on it, then your iPhone 4S issues might not be fixed by a reset. In that case, go to your nearest Genius Bar for consultations.

How to Jailbreak the iPhone 4S and iPad 2 Untethered With Absinthe


The moment you’ve all been patiently waiting for. This iPhone 4S untethered jailbreak and iPad 2 untethered jailbreak have been released.

Indeed, as we initially told you just a few minutes ago, you can now download Absinthe and jailbreak your iPhone 4S or iPad 2 untethered.

Check inside as we guide you through the entire jailbreak process step-by-step…

How to Jailbreak the iPhone 4S or iPad 2 with Absinthe

Step 1: Download, extract, and run Absinthe.

Step 2: Connect your iPhone 4S or iPad 2 via USB.

Step 3: Click “Jailbreak” to run the Absinthe jailbreak. It will take a while on the beginning portion, and eventually your iPhone 4S or iPad 2 will look like it’s restoring a backup. It will say “Restoring in Progress”. This can be pretty lengthy. Don’t worry, it’s working. Don’t touch your device until completely finished!

Step 4: Once completed, unlock your iPhone if necessary, and you should see an Absinthe icon on the Home screen. You may have to search for it if you have a lot of app icons. Tap the Absinthe icon, and it should load the GreenPois0n site, and will then reboot your device. Once it loads back up, the Cydia icon will have replaced the Absinthe icon.

Step 5: Your iPhone 4S or iPad 2 is now jailbroken! It took a while, but it was certainly worth the wait. Now all that’s left to do is load Cydia for the first time, and start downloading your favorite jailbreak apps and tweaks.

Are you guys happy to finally have an iPhone 4S or iPad 2 untethered jailbreak for iOS 5.0.1? What’s the first jailbreak app or tweak that you’ll download?

iPhone 4S and iPad 2 Untethered Jailbreak Released


It’s here! The iPhone 4S and iPad 2 untethered jailbreak for iOS 5.0.1 was just released after months of anticipation, and months of hard work by pod2g and the rest of the leaders in the jailbreak community.

A huge thanks is owed to the dream team of hackers including pod2g, p0sixninja, MuscleNerd, planetbeing, Saurik, and no-doubt countless others.

Take a look inside for more details surrounding this groundbreaking moment…

Facts: This is the first jailbreak, untethered or otherwise for the iPhone 4S. The iPhone 4S was released last October, so it took about 3 months for a jailbreak to come to fruition.

This is the second jailbreak for the iPad 2. The first was Comex’s Jailbreakme for iOS 4.3.3. It took a bit over 4 months for the first iPad jailbreak to be released, so the iPhone 4S jailbreak was actually released fairly quick.

The iOS 5.0.1 untethered jailbreak is compatible with the following:

- iPad 2 running iOS 5.0.1
- iPhone 4S running iOS 5.0 or 5.0.1


As previously noted, there will be three jailbreak tools released that are all capable of jailbreaking the iPhone 4S and iPad 2. They are as follows:

- Absinthe – A traditional graphical user interface jailbreak tool.

- Dev Team CLI – A command line inteface that’s great for troubleshooting.

- RedSn0w – The Dev Team’s traditional graphical user inteferface used for jailbreaking. This will be released sometime later after the CLI.

So far, only Absinthe for Mac is available. A Windows version is in the works and should be released shortly. The Dev Team’s CLI shouldn’t be too far away either. We’ll keep you informed as news come.

Head over to our downloads page and download Absinthe now. We’ll be following up shortly with a full tutorial that shows you how to jailbreak your iPhone 4S and iPad 2 using this new tool, along with the Command Line Interface tool (CLI) from the iPhone Dev Team.

Excited much?

How to Get Multitasking Facility on Old iPhone Without Any Jailbreak


It is needless to say that the latest versions of the iOS platforms have got more versatility and flexibility in terms of applications and their management. But even if you have got an old or previous model of the Apple iPhone, you should not bother about the multitasking feature as there are many companies that have developed and launched much compatible software & applications. Without delving much deep into the matter, let us cast some eye-shower on the application format and its uses. Bringing all the sentiments to your favorite gadget is not a very typical and complicated task given you have read all the conditions and implications of using this application.

There is a firmware in the name of Whited00r which will give you an amazing experience to add the brilliant features of device syncing, app folders and multitasking at the task time. You can bet over this theme due to the fact that it owes and that deals with the jailbreaking. Well, without confusing you the biggest merit to get under the scanner of Whited00r is that your iPhone will not need any jailbroken.

The Whited00r is nothing but an upgraded version of firmware 3.1.3 through which the valued consumers have already taken benefits to old iPhones and iPod Touches. It should be noted here that using this application will simply keep you deprive of using the notifications and you will also not be capable of getting access to the App store of the company, Apple. In the video released, the application stops your access to the iCloud syncing. To your pleasure, Exchange and Dropbox have got excellent sync options. Beta versions are available in the market now but you will need to visit its official website to download the latest and most stable version of Whited00r 5.1 version.

- After download, you should unzip the package.

- Choose your device model like iPhone or iPod Touch from the list by opening the iTunes on your PC or system.

- Hold the Shift button for Windows and Option for Mac. Holding the button, you should now click on the Restore button.

- Be patient as the process will take something about 15 minutes and your device will be automatically rebooted.

- After the device boots itself, the user now should select ‘Set Up as new iPhone/iPod’.

- After the set up process is complete, you can load your music, photos and videos to the device. You are now free to use your iPhone in a normal way.

Stay Tune with us For More How to Guide.

How to Create Customized and Most Perfect Facebook Cover and Photo on iPhone


Many a people are quite confused to load their favorite photo cover for the Facebook and if they own an iPhone, it becomes more complicated. Creativity is a different thing to consider for the Facebook cover photos and the labeling of the cover photos with the needed size has always been the dream of owner. You will also certainly like to incorporate the profile pictures into your Facebook cover.

Beginning from the initial point, you can look on for different guides and sections on the internet that will teach you how to create elegant and creative photo covers for your Facebook profiles. It is needless to say that you can also use these pictures and incorporated beautiful photos in different profiles at the same time. But, if you are not satisfied with the great creation and innovation of several guides and you think lured by the software applications, you can just look into your iPhone.

As per the latest reports, Mashable had great news for you for this task. You can download the free application form iTunes which comes in the name of Facebook Cover Designer. This application available at iTunes can assist you a lot in creating one of the most beautiful, customized and elegant photo cover for your profile. The software has also offered an opportunity to upgrade it in the higher version by spending just 9 cents that will unlock some new, fresh and hidden features related to photo cropping. So, how this application works in your iPhone? Well, let us see it.

- The user is free to take a new photo directly into the application. You also feel free to import your picture from your digital camera, Picasa, Instagram or Photobucket.

- After selection of the correct photo, you all need to do is to crop & adjust the photo. It totally depends on you whether you want o create a profile cover or include the profile photo in the application.

- The former option will compel you to download the latest ‘Pro’ version which will allow you to use some hidden and quality filters. After these, you can upload your photo cover.

- After adjustment and cropping is done to the photo, just apply a filter.

- While uploading the photo or cover on your profile, you will notice the progress bar.
In this way, you can change your profile photo or cover or both at the same time through this application.

How to Transfer Text Messages of iPhone to Computer

If you want to save the text messages from your iPhone to your pc and then prints all the text messages from the iPhone? Then here is a very easy way of transferring the text messages from your Iphone to PC and print or manage all the text even from the computer.

Tool required by you: Software of text message backup software in iPhone. Through this software, you can easily transfer all your text messages to the PC and then the texts could be further used by you.

Here are the steps for the easy process of transferring your text messages to your PC:

1.Firstly, you have to download this Text message Back up software for free, and then install the software on your computer.

2.Connect your iPhone to the PC.

3.Start Tansee iPhone Transfer message, the information of the messages will be displayed automatically on your screen.

4.For the copying of all the SMS on your computer, click on the “Copy All SMS,” on the right top of the 1st screenshot. Then, you have to select the options:

If you like to copy the messages from a particular contact, then, click on button “Copy SMS from whom” and then select the options:

1.Choose the file type: You can select file format of TXT in particular contact SMS transfer.

2.Choose the file path: Select the location, where to store backup files.

Note: The advanced option in single contact SMS transfer is disabled. Moreover, you can copy only 1st 100 items with the use of trial version.

Now this software of text message of backup on your iPhone can help you to backup all your text messages from your iPhone to the PC in the TXT file format or the ANTS file format. Moreover, it will be very easy for you to manage those messages on the computer or you can even take print out of them, if necessary.

Here are some more details of this software of text message backup on iPhone:
It can backup the messages from iPhone to PC before the phone refuse to receive new SMS.

Manage and View old SMS of your phone in the computer.

You can View the SMS in ANTS file format or Text file format on your computer.

It also serves you the facility of Password protection support in ANTS file only.

Hope this could help you to manage all your text messages from your iPhone.

How to Backup Your iPhone/iPad Cydia apps

iPhone is one of the most sales phone in the market and We all know that Without apps there is not much use of it, so apps place very important Role for iPhone user. There are thousand of apps available in all category for daily use.

Many apps available in Apple iTunes apps store and some of them are free and some of them are paid apps, but if you have jailbroken device then you can use Cydia apps on your device. Cydia apps is 3rd party apps and you can not use it without jailbreak.

If you have Cydia apps on your device then you must have to take backup of it, because when you upgrade your device to new version of ios then you will lose your jailbreak and all the Cydia apps. So now here is the step by step guide to take backup of Cydia apps.

With the help of AptBackup you can take backup of your iPhone Cydia apps.

Here is the step by Step guide to take backup of your iPhone and iPad apps with AptBackup:

Step 1 : Download and AptBackup From Cydia Store. it’s free from BigBoss Repository.

Step 2 : Now install AptBackup on your iphone or ipad.

Step 3 : Now go to HomeScreen of your device and find the AptBackup icon.

Step 4 : Now launch the apps and click on backup button.

Step 5 : Your Cydia apps was now backuped.

You can Restore it any time.

How to sync iPhone calendar with iPad?

If you are in possession of as iPhone as well as an iPad , then it must be so because they are both very useful for the business purposes. If you are able to sync these two devices’ calendars then it will be helpful for you as it will be saving your time as well as efforts. This will be useful because, when you update the calendar in one device, the calendar in the other one will be automatically updated saving you the effort to update it again in the second device. You can sync the calendars of your iPhone and iPad in many ways. They are:-

1.Using iTunes software

2.Using iCal app

3.Using MobileMe

4.Using the wireless syncing method

You can use any of these methods the step by step guidance of which is given below. If you are using the iTunes software for syncing your devices then follow these simple steps as this method is best for those who are new to all this. This method works well with both operating systems i.e. Windows and Mac.

1.First step is that you will have to connect your iPhone to your PC. After connecting, iTunes will open automatically. If it does not open automatically, then you will have to launch it.

2.You will see the list of devices where you will have to select iPhone.

3.You will then have to select the “info” tab and then click on the section called as” calendars”.

4.You will have to select the option”sync the calendars “with Outlook.

5.You will be able to sync all the calendars or any specific calendar to your iPad.

Using iCal App:- it is only useful for the PCs with the Mac. operating system, which is equipped with this app.

1.The first three steps till you reach “info” tab are the same to that of the process for using iTunes software.

2.Select the option ’sync iCal calendars’ once you are on “info” tab.

3.In this method also you have the option of choosing the calendars which you want to sync with your iPad.

Using Wireless method:- with the help of iCloud you are able to store all your documents, music , data. It will also help you to sync your devices.

1.Select “settings” on your chosen device and then select “calendars”.

2.Select and tap on “sync one month back”.

3.Select “fetch new data” and then tap on “hourly” option.

Using MobileMe:- though this method is not preferred over the other methods as it is expensive and will cost you $100 per annum. Still if you are interested in using this method, then follow the steps given below.

1.Launch “settings” and tap on “mail accounts”.

2.Select ‘on’ for “sync calendars” option.

3.Change on the calendar of one device will be automatically reflected on the other device.

Stay Tune With us For More Details,We will update you with more information about iphone and ipad.
Copyright 2011. All rights reserved.
artist photos