How to Lock Portrait Orientation in iPhone 4S

iPhone 4S held sideways with the Portrait Orientation Lock enabled.
The iPhone 4S Portrait Orientation Lock prevents your screen from shifting to landscape mode when you're reading and lying down.

How do you lock portrait orientation in iPhone 4S when the screen orientation automatically changes with how you hold your phone? In Messages for example, you can type in landscape or portrait orientation by just holding the phone sideways, or upright. This landscape-portrait orientation shift happens automatically. But what if you're lying down? You're going to be holding your phone sideways and so your screen shifts to landscape orientation. How do you lock it to portrait orientation so you can type and read stuffs upright?

Step 1. You can lock the portrait orientation in iPhone 4S by first double clicking the Home button. Four of your recently used apps will appear at the bottom of the screen.

The recently used apps in iPhone 4S appears in view by clicking the home button twice.
The recently opened apps will appear by clicking the Home button twice in iPhone 4S.

Step 2. Now swipe right over the apps and you'll end up with five icons (left to right): The Portrait Orientation Lock, three music control buttons, and the Music app. The Portrait Orientation Lock is the leftmost icon with the circular arrow symbol.

The Portrait Orientation Lock icon appears by swiping to right over the recently opened apps.
Swipe right over the recently used apps to find the Portrait Orientation  Lock icon.

Step 3. To lock the iPhone 4S screen in portrait orientation, select the Portrait Orientation Lock icon. A "lock" will appear inside the circular arrow, and the status 'Portrait Orientation Locked' will briefly appear below the icons. Select the Home button again to exit.

The Portrait Orientation Lock enabled.
The Portrait Orientation Lock icon, once selected, will show a "lock" symbol inside the circular arrow.

Notice that the Portrait Orientation Lock symbol will also appear in the status bar right at the top of the Home Screen and between the time and the battery level symbol.

The Portrait Orientation Locked symbol appears in the status bar at the top of the iPhone 4S screen.
That "Portrait Orientation Locked" symbol appears in the status bar when it is enabled.

With the portrait orientation locked, you can only type, browse photos, and read in upright position. Of course, apps that are developed and released in landscape view cannot be "forced" to portrait. To disable the portrait orientation lock, just repeat the three steps above. When you do that, the "lock" will disappear from inside the circular arrow symbol in the Portrait Orientation Lock icon, the status "Portrait Orientation Unlocked" will confirm your action, and you can start shifting between landscape and portrait orientations again.

Additional info: It is the 
gyroscope inside the iPhone 4S that senses and maintains the screen orientation using the concept of angular momentum (Google is your friend). Circuits inside your phone receive the gyroscope output, feeds it to your firmware, and your firmware decodes the output and shifts the screen orientation accordingly.

How to Add Birthdays in the iPhone 4S Calendar

If you want to add someone's birthday in your iPhone 4S Calendar, you will need to add a Birthday field to that contact in your Contacts app. The iPhone 4S Mail, Contacts, and Calendar apps are integrated so specifying a birthday to a contact would result to a birthday event being automatically created in your Calendar without you having to create (or reenter) it manually. Birthday events will be treated as all-day appointments. Like ordinary appointments, you will get a notification or alert for birthday events as well. Below is a step-by-step tutorial on how to add a birthday field to a contact, and consequently a birthday event to the iPhone 4S Calendar.

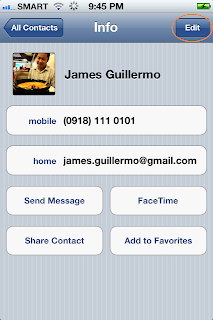
Step 1. Go to Contacts. Open the contact that you want to a add a birthday field to. Select Edit.

Screen shot of a contact's Info panel in iPhone 4S.
The Edit button for a contact's info in iPhone 4S can be found on the upper right corner of the Info panel.

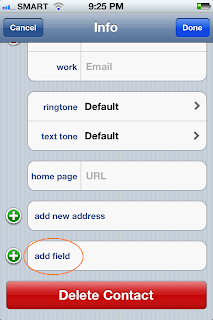
Step 2. Browse all the way down to the bottom of the contact's Info, and select add field.

Screen shot of add field option in a contact's info in iPhone 4S.
The "add field" option for a contact's info lets you add details like Nickname, Job Title, and Birthday.

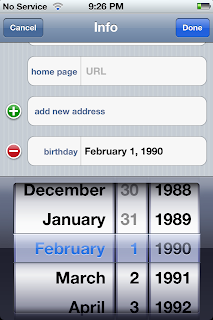
Step 3. From the Add Field list, select Birthday and specify the contact's birth date. After that, select Done.

Screen shot of add birthday field option for a contact's info in iPhone 4S.
You can specify a contact's birthday by rolling through the month-date-year  selector in the add Birthday field.

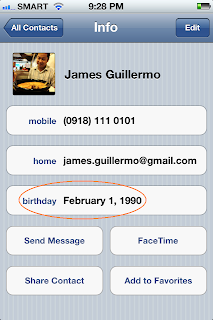
Step 4. The contact's birthday should appear in Info along with the contact other details (mobile, email, etc.).

Screen shot of contact's Info panel in iPhone 4S with a birthday field.
A specified birthday will appear along with the contact's other details in Info.

Step 5. Go to Calendar, and confirm that a birthday event has been created for that contact.

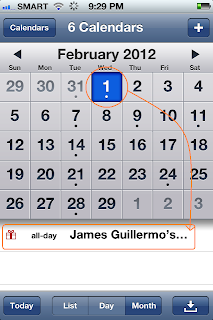
Birthday event in iPhone 4S Calendar.
To view a birthday event in Calendar, simply select the date and it should be listed at the bottom  along with other available appointments for the selected day.

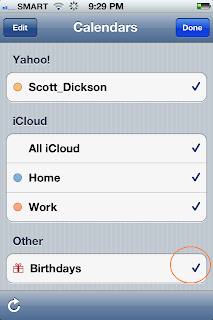
Step 6. Make sure that the Birthdays is always enabled in Calendars so that birthday events will appear. To check, select the Calendars button on the upper left corner of the Calendars panel. Browse all the way to the bottom and make sure there is tick mark next to Birthdays.

How to enable the iPhone 4S Birthdays Calendar.
Enable Birthdays in Calendar to make sure that birthday events and alerts will be enabled in the iPhone 4S Calendars app.

That's it. You have just successfully added birthday events in the iPhone 4S Calendar by specifying birthday fields in Contacts. If you want to add a birthday event for a person that is not in your contacts list, you can just add the birthday as a normal event or appointment in your Calendar. Just tap on the "+" (plus or add) sign on the upper right corner of the Calendars panel and specify Someone's Birthday in Title and the Starts and Ends time. Or, you can easily just use the Reminders app. For both cases, you can also ask Siri to do the job for you. The same steps apply for adding birthday events in other iOS devices namely iPad, and iPod touch.

How to Back Up Contacts Using iCloud

The easiest way to back up contacts in iOS 5 devices is through iCloud. Using Apple's latest data-syncing and cloud storage service allows iPhone, iPod touch, and iPad users to manage and store contacts over the air. If you are connected over Wi-Fi or 3G then you can immediately start using iCloud to back up your contacts in 2 easy steps.

Step 1. On your Apple mobile device (e.g., iPhone 4S), go to Settings > iCloud and toggle Contacts "ON". The message prompt "Your contacts will be merged with iCloud" will appear. Select Merge.

iCloud Contacts settings in iPhone 4S.
Enabling iCloud Contacts will merge the contacts from all your other devices, producing a single common contacts list that is stored and pushed in and by iCloud. 

Step 2. Log in to
iCloud.com using your Apple ID and select the Contacts app icon. The contacts in your Apple mobile device should already start appearing. Compare the number of contacts in your device and that in the iCloud address book. Scroll or browse all the way down to see the "numbers of contacts" detail for both lists. If they're not matching, right-click on the contacts list page in iCloud and hit Refresh. When they are, then iCloud has finished syncing.

How to Back Up Contacts Using iCloud
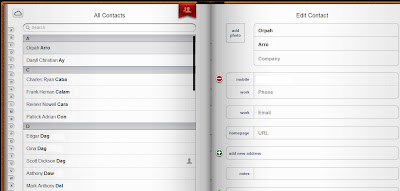
The iCloud Contacts "address book" can be accessed by logging in at iCloud.com. Users can edit a contact detail and the changes will be reflected in all "iCloud Contacts"-enabled devices.

What happens next?
Remember that when you enable Contacts in iCloud, there will only be one "master" contacts list for the cloud and your Apple mobile device. If you have many devices, then this has to be configured separately for each. For example, if you want your iPhone 4S Contacts changes to be reflected in your iPad, then you have to enable iCloud Contacts in iPad (Step 1 above). When you do that, whatever changes in contacts you do in iPad (e.g., edit a contact number, add a new contact, add a profile picture) will also be reflected in iCloud, and in your iPhone 4S.

You only have one device?
If you only have one Apple mobile device, you can still use iCloud Contacts. You can log in to iCloud.com and whatever changes you make on the list here, will be reflected on your device. The same is true, the other way around.

You deleted a contact?
If you delete a contact, this will also be deleted not only in iCloud but in the rest of your Apple mobile devices. Remember: one common contacts list.

You restored your device and lost all your contacts?
If you restored your device and lost all your contacts, iCloud hasn't. Resetting an iPhone, iPod touch, or iPad, does not reset the iCloud account. So if you want your contacts back, simply toggle on Contacts in iCloud (Step 1) again, and the cloud will start pushing your contacts back to your newly restored device.

With iCloud, you won't need your iTunes and USB cable to back up your contacts. All you need is to toggle a button, and it will take care of the syncing, pushing, and storing for you. 

How to Use the iBooks Night Theme

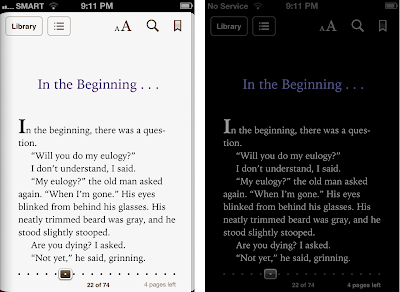
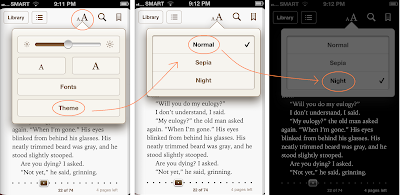
Comparison between Normal and Night themes in iBooks for iPhone 4S.
The iBooks Night theme dims out the brightness of the standard "white-page-black-texts" display of books. (Actual book in the screen shot: Have a Little Faith by Mitch Albom)

iBooks has a Night theme feature which "dims" the brightness and contrast of book pages for low-light and night reading. Night theme lessens the strain caused to the eyes by the brightness of the iPhone or any Apple mobile device's screen  in low-light environments. It changes a book's page color from white to black, and the texts to white. See sample screen shots below.

How to enable the Night theme in iBoooks for iPhone 4S.
You can switch between Normal and Night themes by touching the Font icon located at the top of a page of a book.

To enable the iBooks Night theme, you first tap on a page in any book to reveal the iBooks reading tools at top of the page. Touch the Font icon (AA), and then select Theme. From the list select Night. The page instantly dims down. Tap on any part of the page to hide the Themes list and continue reading. To go back to Normal theme, touch the Font icon again, then Theme, and then select Normal. The iBooks Night theme can be used  when you're flying on red eye where the lights are usually turned off, at night before going bed, or when you simply just prefer a dimmed screen.

How to Sync Photos Using iTunes

iTunes can be used to sync photos from your computer to your iPhone and other Apple mobile devices. If you have photos (taken with whatever camera) stored in your computer and you want them to appear in an album in your iPhone, iPad, or iPod touch, you simply need two things: your USB cable, and iTunes. Let's begin the tutorial.

Step 1. In your computer, organize the photos you want to sync by putting them in a folder. For example, if you want to transfer photos from a summer trip, put them all in a folder with a descriptive name. For this tutorial, I have named my folder "Outer Banks Road Trip". You can put the folder in a directory that you can easily locate for syncing later.
Step 2. Connect your iPhone (or other Apple mobile device) to your computer with the USB cable.

Step 3. Open iTunes. While it's not crucial for this tutorial, it is always a good idea to make sure that your iTunes is up to date. The latest version of iTunes may offer new features and fixes to bugs that might have been present in the previous version. To do this, just go to Help menu and select Check for Updates.

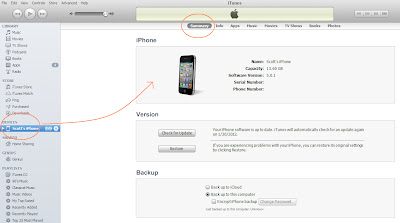
Step 4. Confirm that iTunes is able to detect your device. You will know this because the name of your Apple mobile device (e.g., Scott's iPhone or Sam's iPod) will appear in Devices on the left sidebar in iTunes (see screen shot below). If it's there, select it. Your device's Summary should appear in the center panel of iTunes.

Screen shot of the summary of an iPhone in iTunes when connected via USB cable.
Selecting your device's name from Devices in iTunes will show your device's Summary  page by default. From the top bar you can select the Photos tab so you can point to the location of the folder that contains the photos for syncing to your Apple mobile device.

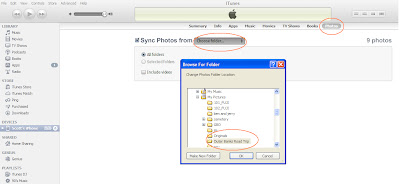
Step 5. On the top bar of your device's Summary in iTunes, select the Photos tab. The center panel should show you the option Sync From Photos. Select it - a tick mark will appear on the left box - and then select the list control button on the right to see the list of directories (For Windows PC the default folder name chosen in the list control box is My Pictures). Select Choose folder... from the list. A dialog box will appear, and then point to the location of the folder that you created in Step 1. Once you have selected the folder name, select OK to close the dialog box.

Screen shot of Photos tab in iTunes where the Sync Photos from option is available.
Your device's Photos tab in iTunes gives you the option to choose the folder  in your computer that you want to sync photos from. You choose a folder by selecting it from the dialog box that appears when you select Choose Folder from the list control button.
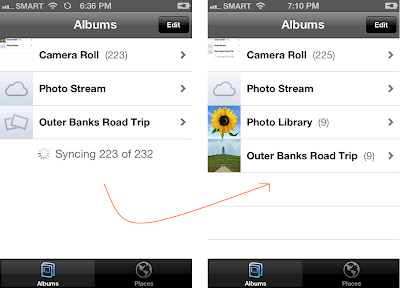
Step 6. On the lower right corner of iTunes select the Apply button. Your iTunes should then show statuses  similar to "Syncing Scott's iPhone" and "Starting Sync". On your iPhone, or whatever Apple mobile device your syncing photos to, the sync symbol should appear on the top bar of the screen, between your network's name and the time. When you open the Photos app, you will also see that an empty album with an exact name of the folder your created in your computer in Step 1, and the status "Syncing..." directly below it (see screen shot below).


Photos synced to an iPhone via iTunes appear in the Photos app organized into albums.
When you hit the Apply button in iTunes, photos from the specified folder will be synced to the Apple mobile device. Once photo syncing completes, the album will appear in Photos app. 

Notice that two albums are created. Outer Banks Road Trip, and Photo Library. Actually Photo Library is not an album and it is not contain duplicate photos to ones you synced. This is just iOS 5's way of creating a library or a point of access to all photos that you sync to your iPhone or other Apple mobile devices. If you sync another batch of photos to your device, a new album, say "Malik's Stag Party", will appear and the photos in that album will also appear inside the Photo Library. Again, there's no actual duplication of photos. Think of Photo Library as, a thumbnail or preview of all the photos that you have synced to your device.

Well, there you go. You have just synced photos to your device using iTunes in 6 easy steps. You can continue to sync more folders of photos as much as the free space in your device allows. Remember that next time you sync using iTunes, whatever changes you make on the folder containing the photos in your computer will be reflected in your device - if you added or removed a photo, all changes will be synced as well. To delete synced photos from your device, remove the selection of the folder in Sync Photos From in iTunes in your computer.

How to Enable Automatic Downloads in iPhone 4S

Music and Apps downloaded in iPhone 4S with Automatic Downloads feature enabled.
Screen shots of iPhone 4S Apps and Music Automatic Downloads.


The Automatic Downloads in iPhone 4S allows the automatic download of purchases made on other mobile devices that use your Apple ID directly into your iPhone 4S. Purchases can also refer to free downloads from iTunes Store. With Automatic Downloads, you won't have to physically sync individual purchases from one Apple mobile device to iTunes in your computer, just so you can share them with the rest of your Apple mobile devices. For example, if you downloaded an app in your iPod touch, this app will automatically be downloaded to your iPhone 4S when it is connected to Wi-Fi (or cellular data network if you set it). Automatic Downloads can be configured separately for each of your Apple mobile device such that your iPod touch can also automatically download purchases made in your iPhone 4S. And since purchases made on iTunes in your computer also use your Apple ID, all these purchases can be automatically downloaded to your Apple mobile devices that have enabled this feature. And it also works the other way around: iTunes can be set to automatically download purchases you make in any of your Apple mobile device. This way, your iTunes Library in your computer and  all your Apple mobile devices are always wirelessly "in sync".

Automatic Downloads Settings in iPhone 4S
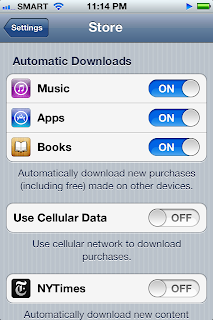
Screen shot of Automatic Downloads Settings in iPhone 4S.

On your iPhone 4S go to Settings > Store > Automatic Downloads. You will see the three options available for automatic downloads: Music, Apps, and Books. Toggle on the options that you want to enable. If you toggle on Use Cellular Data, your iPhone 4S will use your carrier's data network (e.g., 3G) for Automatic Downloads when there's no available Wi-Fi connection. If you are saving on data then toggle this option off.

Downloading music in iTunes with Automatic Downloads for Music enabled in iPhone 4S.
Step 1. On your PC or Mac, go to iTunes > Music tab. Every week iTunes will put up free music for download. In the category section on the upper right side, select Free Music.

Screen shot of iTunes Music in your computer.
iTunes Music offers free music for download every week.

Step 2. Under Single of Week + Exclusive EP Mastered for iTunes, download the free single by clicking on the FREE button.

Screen shot of iTunes Free Music.
iTunes Free Music is updated weekly. Click on the FREE button next to the free music to start download.

Step 3. Your iTunes will start downloading the free music. Confirm by going to the Downloads panel (click on Downloads in the left sidebar of iTunes). When you open Songs in the Music app of your iPhone 4S, you will find that the music you have downloaded using iTunes is also being downloaded into your phone. Notice the spinning wheel beside the song title. This will disappear when the download completes.

Music downloading in iPhone 4S with Automatic Downloads for Music enabled.
Screen shot of music being downloaded in iPhone 4S using Automatic Downloads.

Step 4. When the download completes, you can start to play the music.

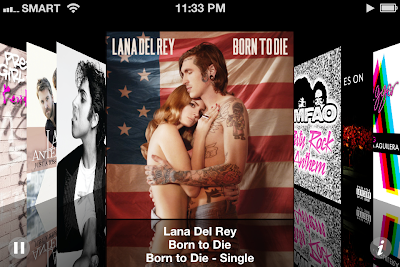
iPhone 4S cover flow showing the downloaded music using Automatic Downloads.
Music that competes download using Automatic Downloads appears in the Music app in iPhone 4S.

Enabling Automatic Downloads in iTunes 
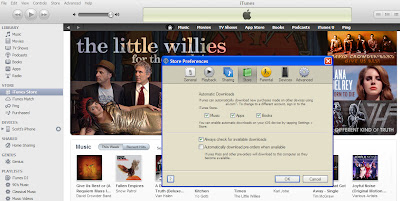
Step 1. Open iTunes. For Windows PC, go to Edit > Preferences and click the Store tab. Toggle on the options (Music, Apps, Books) that you want. (For Mac, go to iTunes > Preferences and click the Store tab).

Screen shot of Automatic Downloads Settings in iTunes.
On iTunes in your computer, the Automatic Downloads options are the same: Music, Apps, and Books. 

Step 2. On your iPhone 4S, open the App Store app and download any free game.

Free app for download at the App Store.
Screen shot of a game for download in the App Store (Snappers by Michael Eliseev).

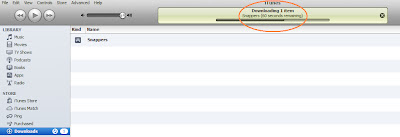
Step 3. Go back to iTunes in your computer and check if the game is being downloaded.

Screen shot of an app downloaded in iTunes with Automatic Downloads enabled.
With Automatic Downloads enabled in iTunes, Snappers, which you purchased using your iPhone 4S, is automatically downloaded.

That's it. The steps for Automatic Downloads in iPhone 4S outlined above is the same for the rest of the iOS devices. It is important to remember that this feature can be configured separately for each Apple mobile device and so you have to individually set up each to use this  feature. Automatic Downloads makes sure your Apple mobile devices have the same purchased apps, book, and music content without having to manually and physically sync them to iTunes in your computer. It makes syncing with your iPhone 4S easier and it sure saves you a lot of time. Enjoy!

How to Configure Keyboard Settings in iPhone 4S

iPhone 4S virtual keyboard in Messages.
The feature-rich iPhone 4S virtual keyboard.

The keyboard settings in iPhone 4S are easy to configure. Like most Apple mobile devices running on iOS 5, you get to select among regional keyboard options, enable "auto-" features, and create shortcutsA lot of frustrations in using a virtual keyboard comes from not utilizing the available settings to customize it.This article will help you configure the keyboard settings in your iPhone 4S so you can be comfortable with it. Hopefully, learning these settings will also help make your typing faster and easier. The discussions that follow assume that your language setting is English (General > International > Language). But even if you have set your iPhone 4S to your native language, the meaning and purpose of the available keyboard options still hold true.

On your iPhone 4S, go to Settings > General > Keyboard. Let's discuss the available options listed here one by one.

Screen shot of the iPhone 4S keyboard settings.
The iPhone 4S keyboard settings can be accessed by going to Settings > General >  Keyboard.

Auto-Capitalization - This iPhone 4S keyboard setting allows the automatic capitalization following the rules of English. Examples are the first letter of a sentence, proper nouns (e.g., India, David, iPhone), famous acronyms of organizations (e.g., UNICEF, WTO, NASA), and the pronoun "I". If you are typing a name that is in your Contacts list, this feature will also auto-capitalize the first and last name. If you toggle this option on, you won't have to touch the shift key to capitalize a letter when it has to be.

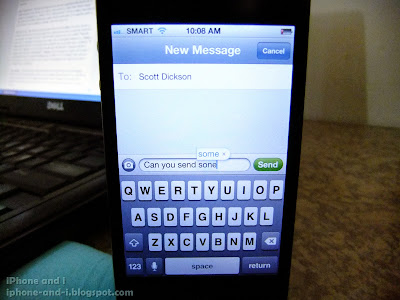
Auto-Correction - This keyboard setting in iPhone 4S will suggest and correct the spellings of words as you type. It predicts the word you intend to input and suggest it in a small bar exactly above or below the actual word your are typing. For example, if you type "colorf" this feature will predict the word "colorful". When this feature detects a misspelling, or if the word you are typing is not in your language dictionary (e.g., English), it will automatically replace the word you typed with its prediction when you touch the space or return key. If you have typed "affprdable," Auto-Correction will replace this with "affordable". Remember that this is language-specific (General > International > Language). If you are typing the Spanish word "porque", a misspelling will not be auto-corrected if the language in your iPhone 4S is set in English. Lastly, when you don't wan't to use a correction, you can choose to ignore it by touching the word suggestion bar before touching the space or return keys.

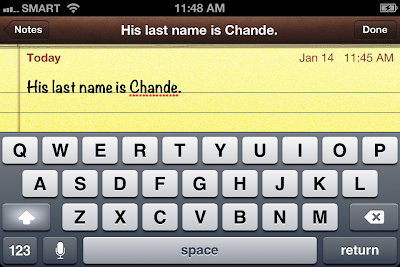
Check Spelling - This option will put a dotted red line under typed words that are not in the language dictionary. This iPhone 4S keyboard setting will not replace or correct anything. What this feature does is basically tell you that you might want to check the spelling of the underlined words. Examples of words that will be underlined are foreign family names, and the words you typed where you dismissed the Auto-Correction suggestions.

The iPhone 4S Check Spelling keyboard feature in Notes.
The Check Spelling keyboard feature in iPhone 4S underlines a typed word that is not in the English dictionary. 

Enable Caps Lock -  This keyboard setting will allow you to use caps lock in iPhone 4S by touching the shift key twice.That way, if you want to type a word in all caps, you won't have to touch the shift key repeatedly.Caps lock is enabled when the shift key is highlighted in blue. To release caps lock, you only have to touch the shift key once.

International Keyboards - This iPhone 4S keyboard setting will allow you to specify the software and hardware keyboard layouts available for your language. For English, Software Keyboard Layout has three option: QWERTY, AZERTY, and QWERTZ. These represent the order of the letters on the first row of the virtual keyboard. You can set this according to what order you are familiar and comfortable with (see AZERTY French keyboard snapshot below). Hardware Keyboard Layout on the other hand is more useful for customization with language settings other than English. For example, if your language setting (General > International > Language) is Bulgarian, your Software Keyboard Layout options become: Bulgarian, and Bulgarian-Standard; and the options for  Hardware Keyboard Layout are: Bulgarian, and Bulgarian-Phonetic. The International Keyboards setting allows foreign users of iPhone 4S and other iOS devices to converse in their native language using symbols and familiar keyboard layouts. This is particularly useful for setting up the the iPhone 4S keyboard for script-based languages like Arabic and Chinese, to mention a few.

iPhone 4S International Keyboard setting.
The iPhone 4S virtual keyboard can be set to include international keyboard formats. This screen shot shows the French AZERTY keyboard.

Shortcuts - This latest keyboard feature available for iOS 5 allows creating customized key combinations for commonly used phrases. For example, the shortcut "omw" is set by default for the phrase "On my way!". If you type "omw" using your keyboard, Auto-Correction will suggest "On my way!" and touching the space or return key will print the phrase on screen for use. To add more shortcuts, select Add New Shortcut... and begin typing a Phrase and Shortcut pair. All the shortcuts that you have added will be listed along with the other keyboard settings in iPhone 4S. You can delete a shortcut by selecting Edit on the upper right corner of the Keyboard panel, select the individual shortcuts you want to remove, touch DELETE, and then Done.

Adding iPhone 4S keyboard shortcuts.
The iPhone 4S keyboard settings allows you to create shortcuts for your most commonly used phrases and expression in emails and messaging.

That's it. Those are all your available keyboard settings for iPhone 4S. It is important to configure your virtual keyboard settings in so that you can type normally, with ease, and in a convenient and comfortable manner. What good is a phone if you can't type well with it, right? Maximize your iPhone 4S by utilizing all your available settings - that's the best way you can truly enjoy the iPhone 4S experience.

You might also like to read this article about
iPhone 4S keyboard tricks.

How to Set Up Emails on iPhone 4S

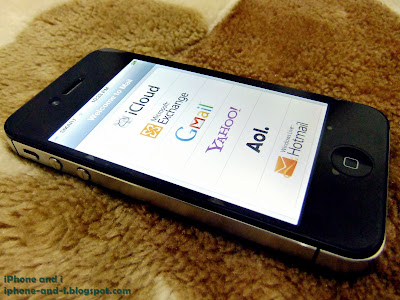
iPhone 4S list of supported email services in the Mail app.
iPhone 4S has easy set up options for popular email services like Microsoft Exchange, Gmail, Yahoo, and more. 

To set up emails on iPhone 4S, the number one requirement is that the email accounts have to be already existing. Setting up an email account on iPhone 4S is not the same as signing up for an email account. You sign up for an email account using email services like Yahoo, Gmail, or Hotmail. Once an account has been created (or if you already have an account that you have been using), then that's when you can set it up on your iPhone 4S. Setting up emails on iPhone 4S has the following benefits: you can access your emails  anywhere with an Internet connection (Wi-Fi or 3G); no need to open a web browser and type email service URL; you won't need to constantly sign in.

Let's take Gmail as an example. To setup an existing Gmail account on iPhone 4S, do the following:

Step 1.On your iPhone 4S, go to Settings > Mail, Contacts, Calendars > Add Account. A list of supported email services will appear. Click on Gmail.

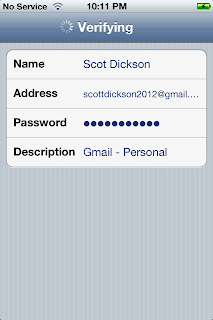
Step 2. Type in your Gmail account details. To successfully set up your mails on iPhone 4S, these details have to be accurate. The email service server will be contacted for verification of your account, and an invalid entry will keep you from setting up your email on the iPhone 4S Mail app. You only type your email account details once and that's during this step.

iPhone 4S email settings for setting up Gmail account.
To set up your email account on iPhone 4S you will need to provide accurate email account details for verification. 

In the above screen shot, Name is the name of the registered email account; Address is the corresponding email address; Password is the case-sensitive password for your email account. Description is how you want to identify this email account on your iPhone 4S. You are allowed to setup multiple emails from different email services on iPhone 4S. Description allows you to distinguish one from the other.

Step 3. When you are sure that the details you have provided are accurate, click Next and your account details will go through Verification. Make sure that you have an Internet connection either through Wi-Fi -or- your carrier's cellular data network (turn celluar data on: Settings > General > Network > Ceullar Data "On"). At this point your details will be forwarded to your email service server for verification. Once that completes, you will be informed that your account has been "Verified". If you have provided an invalid entry, you will be informed that something is incorrect and you're going to have to check and re-input your email account details.

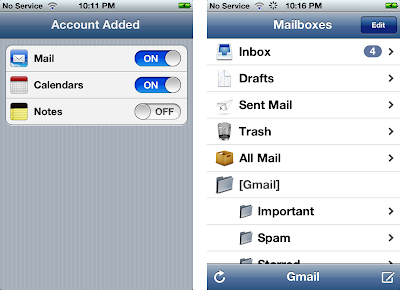
Step 4. When your account has been verified valid, you will next have to configure a couple of Mail apps for your newly added email account (see screen shots below). Make sure Mail is toggled "ON" otherwise even though your account has been verified, your emails will not be pushed to your iPhone 4S. Calendars from Gmail will also be synced to your iPhone 4S if you toggle Calendars "ON". The same goes with Notes. After that, click Save and "Account Added" will be written across the top bar to confirm your successful set up. And that's it! You have just successfully set up Gmail on your iPhone 4S. your account will be added to the iPhone 4S Mail app which you can access from the iPhone 4S home screen. When you click on the Mail app button, your Gmail account will already appear and you can start sending and receiving emails using your iPhone 4S.

Successfully added Gmail account on iPhone 4S Mail app.
When an email account is successfully set up on iPhone 4S, it will appear in the Mail apps located in the home screen.

To set up emails on iPhone 4S from a different email service provider, the same set of steps apply. The important thing to remember is that in order to successfully set up emails on your iPhone 4S, you have to input the correct email account details. Adding multiple email accounts on your iPhone 4S is possible (just repeat the steps above for each). When you that, you can access all your email accounts on your iPhone 4S simultaneously.

To learn how to configure notifications for new emails, read the article about
How to Customize the Notification Center in iPhone 4S.

Fixing the iPhone 4S Camera Flash Issue

The back camera of iPhone 4S.
The iPhone 4S back camera is a powerful 8 megapixel camera with improved optics.

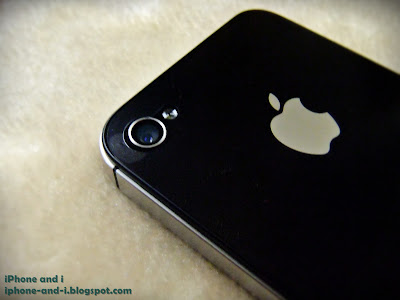
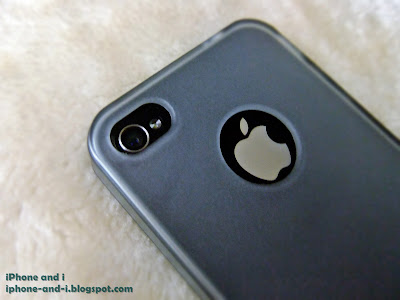
The iPhone 4S camera flash issue refers to the hazy and washed out photos resulting from turning the iPhone 4S camera flash on. Your iPhone 4S camera takes amazing photos until you turn the camera flash on and then you see a significant bleed through in the resulting photos characterized by that smoky, hazy quality.  The iPhone 4S camera flash issue is actually not an "iPhone 4S camera flash" issue. What's causing it is the iPhone case and/or that thin transparent film you use to protect the back of your iPhone 4S from scratching.  If you didn't remove the back plastic cover that comes with the brand new iPhone 4S, then that's also the reason why you're reading this article. The fix to the "iPhone 4S camera flash" issue is simple: there should be no obstruction to the back camera. Your protective case, or transparent back plastic must have an adequately sized hole for the back camera. Otherwise, the light from the flash bounces back from these obstructions and your camera will captures it, thus the hazy washed out quality (see sample shots below).

To avoid the iPhone 4S camera flash issue, use a protective case that does not obstruct the light from the flash of the back camera. Before buying a protective case, ask the store personnel if you can try it on. Once its on, take photos with your iPhone 4S camera flash on. If the resulting photos are not washed out, then you're good.

A protective case or jacket for iPhone 4S with sufficient hole for the back camera to avoid capture and flash obstruction.
iPhone 4S camera flash issue is caused by phone cases that obstruct the back camera.

iPhone 4S camera flash is turned on in taking the picture below but the original back plastic cover was not removed. The resulting photo has that hazy, washed out effect.

Hazy and washed out iPhone 4S shot with the camera flash enabled.
iPhone 4S camera flash issue sample shot. Notice the flash bleed  through. 

iPhone 4S camera flash is also turned on in taking the picture below but this time, there's no obstruction to the back camera. Notice the difference in photo quality.

Amazing iPhone 4S shot with the camera flash enabled.
iPhone 4S camera flash issue is fixed by removing back camera obstructions.

The iPhone 4S camera flash issue, according to some discussions on the Internet, is a design flaw. I personally don't think it is. Even if you use a regular point and shoot camera, if your finger obstructs the flash, you certainly won't end up with a usable photo. So in order to "fix" the iPhone 4S camera flash issue, don't use a protective case that will obstruct the back camera. That's it. Enjoy taking great pictures!

How to Activate FaceTime in iPhone 4S

Active FaceTime call in iPhone 4S.
FaceTime on iPhone 4S allows video calls between Apple mobile devices.

To activate FaceTime in iPhone 4S involves just one step: Go to Settings > FaceTime and toggle it "ON". That's it! You can start making video calls over Wi-Fi or 3G with any Apple mobile devices using iOS 5, which can include iPod touch, iPad, and iPhone. When you have activated FaceTime in iPhone 4S, you'll have the option to switch to FaceTime right in the middle of an SMS or iMessage conversation. You only have to select the FaceTime button at the top of your current (message) conversation, and a FaceTime call will be initiated. Note: There is no FaceTime app icon in iPhone 4S. Activating FaceTime in iPhone 4S does not put a FaceTime app icon on your screen either. The FaceTime app icon is only visible in iPod and iPad. Before going further, let me explain the rest of the FaceTime settings, which are automatically set during  your iPhone 4S activation and so you don't need to re-modify them to active Facetime.

iPhone 4S FaceTime settings.
To start using FaceTime, configure s few settings in iPhone 4S .

Apple ID - This is your Apple ID. This is what you use to log in to iTunes and App Store. This is also your iMessage and FaceTime User ID. You can only change this if you restore your iPhone 4S as a new phone, during which you will be asked to specify a (valid) Apple ID. Or if you go to Settings > Store and log out. FaceTime Activation in iPhone 4S does not require specifying your Apple ID password, unlike making purchases in the App Store. Note that before you can activate FaceTime in iPhone 4S, your would have already been activated  and there is a working sim card inside it. FaceTime activation requires a sim card with a network connection.

Phone and Email - The Phone specifies your mobile number and the Email specifies your Apple ID. Like iMessage, these are the two "addresses" where you can be reached for a FaceTime call. Like Apple ID, these are already set. You don't need to modify these settings to active FaceTime in iPhone 4S.

Caller ID - This allows you to specify what people on the other end of a FaceTime conversation will see as your ID. You can select your mobile number, or your Apple ID. Choosing your mobile number does not mean you'll get charged by your carrier each time you make a FaceTime call. FaceTime and iMessage conversations can be placed over Wi-Fi or 3G.

How to Make your first FaceTime call. 


In iPhone 4S, you can make a FaceTime call by selecting the FaceTime button inside an active conversation in Messages (see below). After that, you will be directed to the FaceTime "window". While your FaceTime call is connecting, you'll see your face in your phone. The iPhone 4S front camera is selected by default. When the recipient of your call accepts, you'll see both of your faces. The available control in an active FaceTime conversation are: Mute, End, and Switch to Rear Camera. To end a call, select the End button and you will be directed back to your previous window. To adjust volume, use the iPhone 4S volume buttons on the side of your phone. When FaceTime in iPhone 4S is not yet activated, no FaceTime calls can be made.

Making a FaceTime call in iPhone 4S from inside Messages.
A FaceTime call in iPhone 4S can be made directly from an existing iMessage or SMS conversation.

Activating FaceTime in iPhone 4S is very easy. You only need to activate FaceTime once. If for some reason you have toggled FaceTime off in Settings, you can turn it back on. FaceTime will be reactivated, and you can start using it again. Connect with your friends using FaceTime in your iPhone 4S by asking for their Apple ID (iPod touch and iPad Wi-Fi) or their mobile number (iPhone, iPad with 3G). FaceTime is one of the "200 new features" of iOS 5. Enjoy video calling! 

How to Improve iPhone 4S Battery LIfe

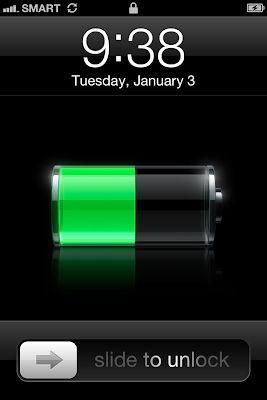
The iPhone 4S battery status on locked screen.
The iPhone 4S battery life depends greatly on your mobile  needs and lifestyle. 

To improve iPhone 4S battery life does not mean to prevent yourself from regularly using it. The iPhone 4S battery supports all the powerful features of the new iPhone and the only way to truly gain the "iPhone 4S experience" is by regularly using it. As matter of fact, getting to know your iPhone 4S is the way to improve its battery life. As you continue to explore its features, you will learn exactly how it will fit with your lifestyle. To improve iPhone 4S battery life is to understand that it's all about customization. How do you want to use it? Which features does your daily life demand? Which features that the battery support don't you need? Below are some useful customization tips to improve iPhone 4S battery life.

1. Check regularly for
Apple's iOS updates. Apple like most electronics company has a group of test or product engineers (or some equivalent) whose job is to find post-release improvements for products that are already in the market. Battery is a critical area of improvement because iPhone usability (not to mention customer satisfaction) greatly depends on it. That is why it is common for firmware updates to include optimization on hardware level operations that can improve iPhone 4S battery life. While Apple does not post iOS update history, a lot other technology websites does. In these records, you'll see how virtually all releases target battery life improvement.

2. Use Camera's HDR only when needed. HDR or High Definition Range is a photographic technique used to improve image quality by capturing three shots at different exposure levels and performing image processing. To improve iPhone 4S battery life, turn this feature on only when needed. While the effect may not be noticeable with just a few shots, capturing 100 shots all in HDR mode will drain your battery faster than regular shots. You will notice your battery getting a little hotter during consecutive shots as well.

3.  Download huge files using iTunes. The iPhone 4S Battery and Power specification says Internet use over 3G will consume a fully charged iPhone 4S battery in 6 hours, and 9 hours if over Wi-Fi. Huge files take longer to download and a longer download means a longer Internet use. Huge files may refer to multiple episodes of a Podcast subscription, a full movie, or  500MB magazine issues. To improve iPhone 4S battery life download huge files using iTunes. Sync these files to your iPhone when download completes.

4. Lock your screen. What do you see when you press the lock button on your iPhone 4S? Nothing - the screen goes black. The power use to display your screen is conserved when you lock your screen. If you like you can even set auto-lock on to ensure that your phone is never left open when you're not using it. Just go to Settings > General > Auto-Lock and choose between 1-5 minutes. If you choose "3 minutes" your phone will auto-lock after 3 minutes of being idle.

5. Turn off Wi-Fi when you're not using it. iPhone 4S will always try to look for wireless networks to join if Wi-Fi is turned on. If you're not using Wi-Fi, improve iPhone 4S battery life by turning it off.

6. Configure screen brightness. Go to Settings > Brightness and select Auto-Brightness "On" or manually select the brightness level by dragging the slider.

7. Configure push notifications. Push notification are very useful in that they give you an alert if you have events or updates from your apps - a new instant message, a comment on your Facebook page, an update for a game - or mails. Sometimes when you run an app for the first time you will be asked if you would allow it to send you push notifications. A stream of push notifications from several apps can drain your battery. So to improve iPhone 4S battery life, you can try to only allow push notifications for apps that are important to you. To configure individual push notification setting for installed apps go to Settings > General > Notifications. Click on the app icon and choose an Alert Style. Choosing "None" for Alert Style turns push notification off for that app. For email accounts go to Settings > Mail, Contacts, Calendars > Fetch New Data. IF you turn Push "Off" you will not be notified immediately when new mails arrive. If you choose "On" you can continue to Advanced and individually configure how each email account handles new mail - Push, Fetch, or Manual. Manual will check for new mails in "N"-minute intervals, which is the time setting selected in the Fetch panel. Fetch will only check mails when you open the email account in the Mail app.

These are just a few tips on how to improve iPhone 4S battery life. The Apple website keeps an iPhone battery optimization page,which you should check for further information on how to keep your battery performance in good shape. It is important to remember that to improve iPhone 4S battery life is all about customization. Know what you need from your phone and know which features you don't need as much.

How to Customize Notification Center in iPhone 4S

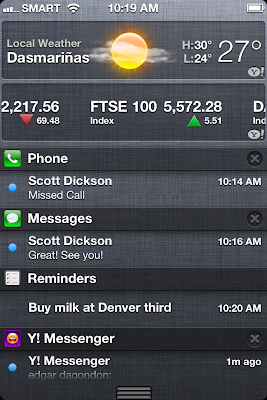
The iPhone 4S Notification Center.
The Notification Center in iPhone 4S contains all the phone and app events requiring your attention.

The Notification Center in iPhone 4S is one of the new features of iOS 5. It is designed as a pull down panel that displays widget information, app notifications, and phone and email alerts.  This feature is accessible by swiping down from the top of your Apple mobile device screen. By default the Notification Center in iPhone 4S displays information from Yahoo's Weather Widget, and Stock Widget, and the following built-in apps: Phone (for calls), Messages, Reminders, Calendar, and Game Center. The complete list of all apps that will appear in Notification Center can be found in Settings > Notifications.

Choosing the Alert Style


A missed call, an unread text message, a scheduled meeting - all these, by default, will be collectively displayed in Notification Center in iPhone 4S. However, the alert style - how iPhone 4S displays a new event - can be configured separately for each. There are three Alert Style options: None, Banners, and Alerts. To better understand how each alert style is different, let's take Messages as an example. On your iPhone 4S go to Settings > Notification.  In In Notification Center: panel, select Messages from the list . This will lead you the the Messages Notification settings (see snap shot below). Let's go through each setting one by one.
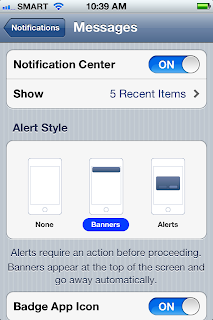
The iPhone 4S Notification Center settings for Messages app.
The iPhone 4S Messages notifications settings allow you to configure how a new message will be handled by the phone and how you will be alerted about it.

Notification Center (ON/OFF) - If you choose "ON" then new or unread text messages will be displayed in the Notification Center. If you choose "OFF" Notification Center will not monitor text message events in your iPhone 4S, and the Alert Style options (discussed below) will be disabled.

Show (Recent Times) - This will decide the number of the most recent unread text messages that will be displayed in the Notification Center. You can choose between: "1", "5", or "10" recent items. If you choose "1 Recent Item", only the most recent text message will be displayed in the Notification Center - the earlier unread text messages can still be found in your Messages (This option does not delete or mark messages).

Alert Style: None - With this style, only the badge app icon will appear. In iPhone 4S (and the rest of Apple mobile devices) this refers to the small circle attached to the upper right corner of the app icon which indicates the number of unread messages. You will still hear your Text Tone if your iPhone 4S is not in Silent Mode but a snippet of the new text message will not be displayed on your screen.
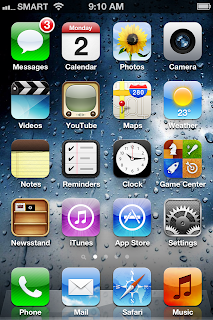
The iPhone 4S Notification Center Alert Style None.
When the iPhone 4S Notification Center Alert Style "None" is chosen, only the badge app icon will appear in the home screen.

Alert Syle: Banners - This style will flip a small banner in view across the top of the iPhone 4S screen for a few seconds. The banner will contain the name of the sender (if the number is listed in your Contacts) and a snippet of the text message. When the banner flips out of view, the badge app icon (red circle in Messages app icon) will remain visible.
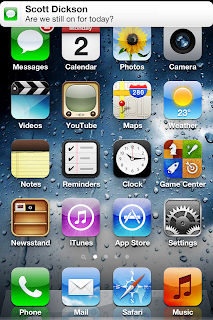
The iPhone 4S Notification Center Alert Style Banners.
When the iPhone 4S Notification Center Alert Style "Banners" is chosen, both the badge app icon and the message banner will appear in the home screen.

Alert Style: Alerts - This is the classic iPhone message alert style in which a "dialog box" will appear with the name of the sender and the message. This is the only style that will give you the option to reply to the message or close it. Unlike banners, "dialog box" alerts will not go away unless you dismiss it. Read and unread messages will remain in Messages regardless of the dialog box option you choose.
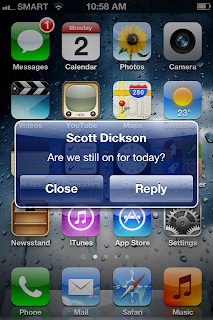
The iPhone 4S Notification Center Alert Style Alerts.
When the iPhone 4S Notification Center Alert Style "Alerts" is  chosen  a preview of the message and/or sender will appear inside a dialog box in the home screen.

Badge App Icon (ON/OFF) - If this is turned "OFF", the Message app icon in your screen will not display the number of unread messages in a red circle.

Show Preview (ON/OFF) - If this is turned "OFF", a message snippet will not be shown for Alerts Styles Banner, and Alerts.

Repeat Alert (N Times) - Choosing "Never" means you will not be reminded that you have an unread message if you ignored or missed the first occurrence of the notification. Choosing "Once" will repeat the alert once; "Twice" will give repeat the alert twice, and so on.

View in Lock Screen (ON/OFF) - Choosing "ON" will wake up your locked screen and show the new message in Alert Style: Alerts. You will have to unlock your screen to enable message control (reply, delete, etc.).

The options above are the same for the rest of the built-in apps: Phone, Reminders, and Calendar events.

Third-Party Apps Push Notifications


When you download and install an app (e.g., Jetpack, Facebook) and you run it for the first time, you will be prompted if you want to allow it to send you pus h notifications. If you select "Allow" this app can notify you of updates, new messages, and what not. In Notification Center in Settings > Notifications  will list the name of the app, and then you can configure the Alert Style along with all the other options available to it in the same way Messages configuration was described above.
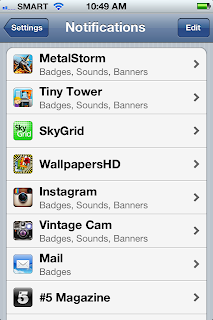
The iPhone 4S Notification Center settings for all installed apps.
The iPhone 4S Notification Center has individual settings for each installed app in the phone.

Notification Center in iPhone 4S is pretty useful. It tracks your emails, messages you have to attend to, important reminders, and meeting schedules all in one place. Since you can control the notification behavior of every single app, the Notification Center in iPhone 4S can be customized to work according your preferences and lifestyle.
Copyright 2011. All rights reserved.

artist photos